Table of Contents
- Why Exterior Paint Peels and How to Stop It
- How to Prepare Walls for Painting
- Best Exterior Primer for Peeling Paint
- Choosing High-Quality Exterior Paint
- Controlling Moisture to Prevent Paint Failure
- Timing and Weather Conditions for Repainting
- Maintaining Your Exterior Paint to Prevent Future Peeling
- Frequently Asked Questions
Last Updated: October 11, 2026
Why Exterior Paint Peels and How to Stop It
Exterior paint peeling happens for three main reasons: moisture gets behind the paint, the surface wasn’t prepared properly, or the paint itself isn’t durable enough for your climate. Understanding what causes the problem is the first step to prevent exterior paint peeling.
Most peeling is preventable with proper moisture control, surface preparation, and durable paint.
Moisture and Water Intrusion
When moisture gets behind the paint layer, it pushes the coating away from the substrate, causing bubbling, blistering, and peeling.
Water intrusion happens in specific places:
- Around window and door frames where caulk has failed
- Along roof lines and fascia boards
- Where gutters overflow or leak
- At foundation cracks or gaps
- Under siding where ventilation is blocked
Before you repaint, you must find and fix the water source. Otherwise, new paint will peel just like the old paint did.
Poor Surface Preparation
Most peeling is a preparation failure. If old paint is glossy, chalky, or loose, new paint won’t adhere. New paint needs a clean, dull, stable surface to bond properly.
Common preparation mistakes include:
- Painting over glossy surfaces without sanding
- Leaving chalk or dust on the surface
- Not removing loose or flaking paint
- Skipping primer on bare wood or new surfaces
- Painting in cold, damp, or humid conditions
Weather Exposure and UV Damage
UV rays damage paint binders, and temperature swings cause substrate and paint to expand and contract at different rates. Choose high-quality paint designed for your climate and maintain it regularly.
How to Prepare Walls for Painting
Preparation is where the real work happens. Skipping these steps guarantees peeling paint within a year or two.
Step 1: Inspect and Remove Loose Paint
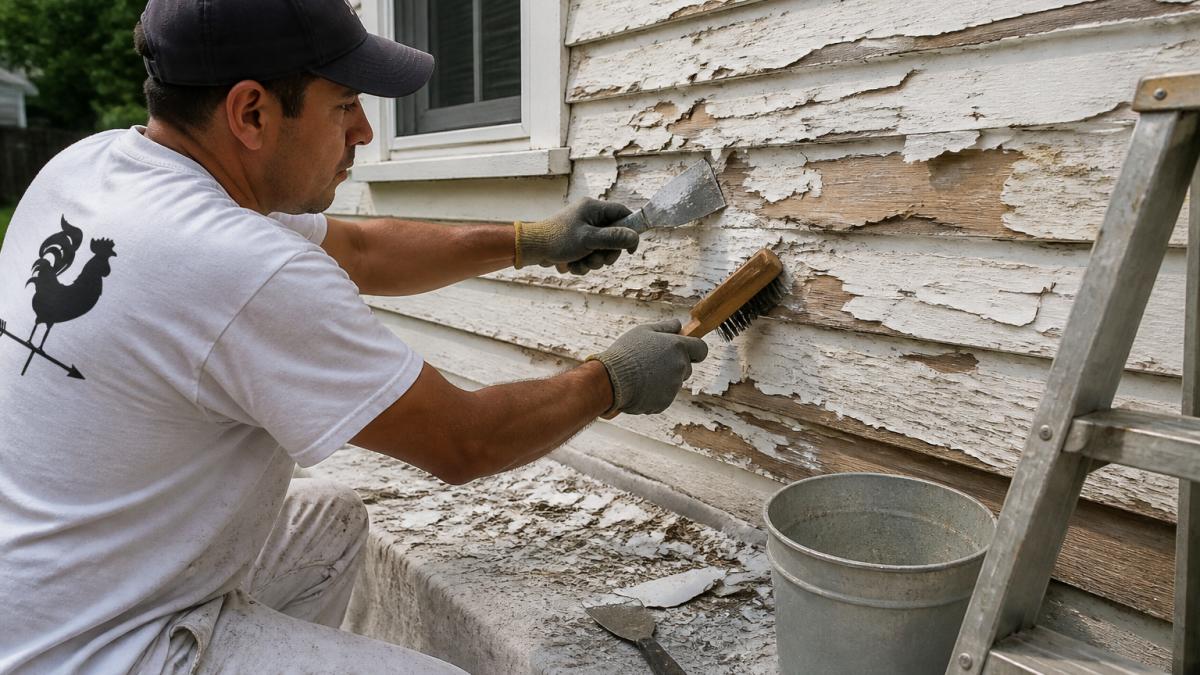
Use a paint scraper to test loose paint edges. Push the scraper under loose paint and pull it away. Extend scraping 2-3 inches beyond visible peeling, as paint can be loose underneath. For large areas, use a power scraper or wire wheel on a drill. Remove all loose paint until you reach firmly adhered paint.
Step 2: Clean the Surface Thoroughly
Use a pressure washer set to 1500-2000 PSI, keeping the nozzle 12-18 inches from the surface. For mold or mildew, apply a mildew-killing cleaner first, let sit 10-15 minutes, then rinse. Allow 24-48 hours drying time before painting. Never paint on damp surfaces.
Step 3: Sand and Smooth Damaged Areas
Sand the entire surface with 80-100 grit sandpaper to remove chalk and create a dull finish. Work in sections with even pressure. For bare wood areas, sand carefully to achieve a smooth, splinter-free surface. Vacuum, brush, and wipe with a damp cloth to remove all dust before priming.
Best Exterior Primer for Peeling Paint
Primer seals the substrate, improves adhesion, and provides a uniform base. The right primer depends on your substrate type and the cause of original failure.
Choose the Right Primer Type for Your Substrate
For Bare Wood:
Use oil-based (alkyd) or acrylic latex primer. Oil-based primers penetrate deeply, seal tannins, and resist moisture better. Acrylic latex dries faster (1-3 hours) but requires two coats on bare wood for adequate sealing.
For Glossy or Slick Surfaces:
Use a bonding primer with special resins that grip slick surfaces. Essential for glossy paint, varnish, or polyurethane. Apply one coat unless the surface is very dark or stained.
For Masonry, Stucco, or Concrete:
Use a masonry-specific primer. These primers are formulated to handle the porous, alkaline nature of concrete, stucco, and brick. Masonry primers are usually acrylic latex and are designed to resist efflorescence (white salt deposits that can cause paint failure).
For Metal Surfaces:
Use a metal-bonding primer or rust-inhibiting primer. If the metal is bare or rusty, use a rust-converting primer that chemically converts rust to a stable surface. If the metal is already painted, a bonding primer will adhere to the existing coating. Metal primers are typically oil-based or specialty acrylic formulations.
Primer Selection Criteria
Beyond substrate type, consider these factors when choosing a primer:
Stain Blocking:
If the substrate has dark stains, tannin bleed, water marks, or mildew, use a stain-blocking primer. These primers contain pigments and resins that prevent stains from bleeding through the topcoat. Stain-blocking primers are especially important on wood with water damage or tannin-rich species like cedar or redwood.
Adhesion to Glossy Paint:
If the existing paint is glossy and you cannot sand it completely, a bonding primer is non-negotiable. Standard primers will not adhere reliably to gloss, and your new paint will peel. Bonding primers are worth the extra cost because they prevent this common failure mode.
Moisture Resistance:
If moisture intrusion was the cause of peeling, use a primer with strong moisture-blocking properties. Oil-based primers and masonry primers with moisture barriers are better choices than standard latex primers in high-moisture environments.
Drying Time:
Oil-based primers take 8-24 hours to dry; latex primers dry in 1-4 hours. If weather windows are tight or you’re working on a schedule, latex primer is faster. However, do not sacrifice adhesion for speed; use the primer type your substrate requires.
Application Guidelines
Apply primer according to the manufacturer’s instructions. Most primers require one coat, but bare wood or heavily stained surfaces may need two coats. Do not skimp on primer coverage; thin primer application defeats its purpose.
- Coverage: Typically 300-400 square feet per gallon; check the label
- Drying time: Allow full drying before applying topcoat (check label; do not guess)
- Temperature: Apply primers only when air and surface temperatures are within the manufacturer’s range, typically 50°F-85°F
- Humidity: Avoid applying primer in high humidity (above 85%) or when rain is forecast within the drying window
Primer and Paint Compatibility
Ensure your primer and topcoat are compatible. Latex paint can go over latex or oil primer, but oil paint should only go over oil primer. If you use a latex primer, confirm the topcoat paint is also latex. Mixing incompatible systems is a common cause of adhesion failure and peeling.
Choosing High-Quality Exterior Paint
Not all exterior paint is the same. Budget paint fails faster than premium paint, especially in harsh climates.
Click here to Schedule Free Quote →
Look for paint rated for your climate zone. If you live in an area with high humidity, intense sun, or temperature swings, choose paint designed for those conditions.
Quality exterior paint contains more binder and pigment than budget paint. This means better adhesion, better coverage, and longer durability. Premium paint typically lasts 7-10 years. Budget paint might peel in 3-5 years.
Acrylic latex paint is the most common choice for exterior work. It’s durable, flexible, easy to apply, and environmentally friendly. Avoid cheap latex paint. The difference between a mid-range and premium acrylic latex paint is usually 20-30% in price but often 50%+ in durability.
Sherwin-Williams and similar professional-grade paints are worth the investment. They resist UV damage, humidity, and weather exposure better than budget alternatives. At Rooster Painting, we use premium paint.
Controlling Moisture to Prevent Paint Failure
You can prepare the surface perfectly and use the best paint available, but if moisture gets behind the paint, it will still peel. Controlling moisture is the foundation of preventing paint failure.
Address Water Intrusion at the Source
Walk around your home and look for sources of water intrusion:
- Gutters and downspouts: Clean gutters regularly. Gutters clogged with leaves can’t drain water. Downspouts should direct water at least 4-6 feet away from the foundation.
- Caulk around windows and doors: Old or failed caulk lets water behind trim and siding. Replace caulk every 5-10 years. Use elastomeric caulk designed for exterior use. It stays flexible and resists cracking.
- Roof leaks: Water running down the inside of walls causes exterior paint to peel from the inside out. Have your roof inspected by a professional if you suspect leaks.
- Foundation cracks: Cracks in the foundation let water into the basement and crawl space. Seal cracks with concrete caulk or epoxy.
- Grading and drainage: Soil should slope away from the foundation so water runs off instead of pooling. If water pools near the house, regrade the soil or install a French drain.
Ensure Proper Drainage and Ventilation
Trapped moisture causes peeling paint. Make sure your home has proper ventilation:
- Soffit and fascia vents: These allow air to flow under the roof, drying out moisture. Keep vents clear of debris.
- Attic ventilation: A well-ventilated attic prevents moisture from building up and leaking into walls.
- Basement or crawl space ventilation: Moisture in these spaces rises into the walls. Use a dehumidifier or install ventilation fans if moisture is a problem.
- Siding ventilation: Some siding types need air space behind them to dry out. Don’t block these spaces with insulation or other materials.
Timing and Weather Conditions for Repainting
Paint application timing matters. Painting in the wrong conditions causes adhesion problems and premature peeling.
Paint only when temperatures are between 50°F and 85°F. Below 50°F, paint doesn’t cure properly. Above 85°F, paint dries too fast and doesn’t flow smoothly.
Humidity should be below 85%. High humidity slows drying and can trap moisture under the paint film.
Avoid painting in direct sun. The sun heats the surface, causing paint to dry too fast and potentially bubble. Paint early morning or late afternoon when the surface is shaded.
Never paint if rain is forecast within 48 hours. Rain can wash away wet paint or trap moisture under it.
Best conditions: 65-75°F, humidity below 70%, no direct sun, no rain in the forecast for at least 48 hours.
Maintaining Your Exterior Paint to Prevent Future Peeling
Once you’ve repainted, maintenance keeps the paint looking good and helps prevent exterior paint peeling.
Inspect your home annually, especially after heavy rain or storms. Look for new peeling, cracks, or areas where caulk has failed. Address small problems before they become big ones.
Clean your gutters twice a year. Clogged gutters are one of the most common causes of water intrusion and paint peeling.
Reapply caulk around windows and doors every 5-10 years. Old caulk cracks and fails, letting water behind the trim.
Power wash your home every 2-3 years to remove dirt, mold, and mildew. These can damage paint over time.
Trim trees and shrubs away from the house. Wet foliage keeps siding damp and promotes mold growth.
If you notice peeling paint, address it immediately. Don’t wait. Small areas are easy to fix. Large areas require more work and expense.
Exterior paint peeling is frustrating, but it’s preventable. Click here to Schedule Free Quote and let us help you protect your home’s exterior with a paint job built to last.
Frequently Asked Questions
What are the primary causes of exterior paint peeling?
Exterior paint peels primarily due to moisture intrusion, poor surface preparation, and UV exposure. Water trapped behind the paint breaks the bond between the coating and substrate. Inadequate scraping, sanding, or cleaning before repainting also causes adhesion failure. UV rays degrade paint durability over time, especially on south and west-facing surfaces. Identifying which cause is at work helps you address the root problem, not just the symptom.
How do you properly prepare a surface to prevent future paint failure?
Proper surface preparation involves removing all loose, flaking, or peeling paint with a scraper or wire brush, then sanding the area with 80- to 100-grit sandpaper until smooth. Clean the entire surface with a pressure washer or detergent solution to remove dirt, mildew, and chalk. Allow the surface to dry completely. Apply a bonding primer designed for exterior use, which improves paint adhesion on difficult substrates. This thorough prep is the single most important step in preventing future peeling.
What role does primer play in preventing paint from peeling?
Primer creates a strong adhesive bridge between the substrate and topcoat paint. An exterior bonding primer is especially important when repainting over previous failures or glossy surfaces where topcoat adhesion is poor. Quality exterior primers resist moisture, improve paint durability, and provide UV protection. Skipping primer or using interior primer on exterior surfaces significantly increases the risk of peeling within one to two years.
Is moisture the main reason for exterior paint peeling?
Moisture is the leading cause of exterior paint peeling. Water intrusion behind the paint film breaks the adhesive bond, causing blistering and flaking. Common sources include leaky gutters, poor drainage, roof leaks, and condensation from inadequate ventilation. Before repainting, inspect for water damage, repair leaks, improve drainage around the foundation, and ensure gutters are clear and functioning. Controlling moisture is essential to preventing peeling from recurring.